Contemporary Planter
Contemporary Planter
Here’s the details on how to make a lovely Contemporary Planter as seen on Ireland AM. This would be a very good beginners DIY project as it involves a lot of measuring and cutting. Two things you will need to become good at, if you intend doing more DIY projects around the home.
Why make them? Wooden planters like this, can be expensive to buy and you can’t get them in many shapes and sizes. And you certainly can’t get them in a variety of colours. But when you make them yourself, you can make it any size you like, which is good if you are looking to fill a particular space and or use a particular pot/plant. Also, you can then finish it off to suit your home decor style, whether modern or rustic. You can use pallet wood, old scrap wood left over from another project or even old picket fencing, I will be doing this next !
Tools you will need for a planter that measures 27cm x 27cm x 32cm
4 lengths of 2 x 1 planed pine
Galvanised panel pins
Hammer
Woodglue
Hand saw or chop saw
Mitre Box ( if using a handsaw)
Measuring tape
Make Your Cuts
You can simply use these measurements or work out your own. I made one tall one and one small one.
The large planter is 47cm and 27cm wide and the smaller one is 27cm x 32cm high.
They are made entirely out of 2 x 1 planed pine boards costing 3 euro each
After you decide on the height you want, in this case 30cm (for the small one) you make four cuts at that length.
These four pieces of wood are the corners and the supports for the whole planter.
For the first two sides you will cut 12 lengths at 24cm
For the second two sizes you will cut 12 lengths at 27cm
I will explain why you have two different lengths later. Now you have all your cuts lets construct the planter.
Building The Planter
Place two of the uprights on the ground on their side and start adding the 24cm cut lengths using wood glue.
TOP TIP Hammer in the panel pins to the slats FIRST, so they are halfway in. Then, when you add them to the uprights, you have very little more hammering to do.
Use a piece of trim as a spacer to ensure all the side pieces are evenly spaced and continue to the end. If you have some space left, but not enough for a length of wood, you can leave it, these will look like legs when its finished.
Make up a second side exactly the same.
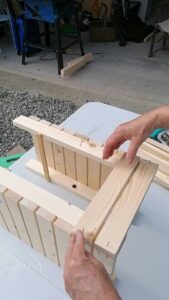
Now you have the first two sides made you need to create a base. To do this you simply add a piece of trim or another length of 2 x1 to the inside part of the sides you just made up,… see photo below.
Do this on both sides. These strips of wood will hold the scrap wood you will use for the base. Remember you can place this base anywhere on the sides. If you only want to place a pot near the top of the planter and not fill the whole thing with soil, you will create a base near the top.
It’s now time to add the last of the slats you cut. These are the longer ones. When you have the two made up sides on the ground you can simply add the remaining slats to them to connect the two sides. Now you will see why you needed these slats 4cm longer. You are not just covering the 2 inch uprights, but also the half inch sides you just made up. See photo below
Add them exactly as before. wood glue and panel pins. If you want to add screws to secure you can, but i am assuming you dont have access to a drill as I am writing this for a real beginner with minimum tools.
To Finish The Top
Now you have all four sides connected and it looks like a planter, lets give the top a better finish. You can do this by cutting four more lengths of 2 x 1 , only this time you will mitre the corners to a 45 degree angle. You can do this with your mitre box or chop saw if you have one.
Then simply add them to the top of the planter for a really professional finish. 
Before you can paint or stain you need to fill in any holes with wood filler and caulk any gaps. Then sand the whole planter. I used a course sandpaper and round off any sharp edges too.
If making this for exterior use you can buy TREATED wood , And you can buy it un planed which means it not a smooth but fine for outside.
To stain, use an exterior wood stain. I like the dark oak from Fleetwood Paints.
To Paint for exterior use, you should prime first with a blocking primer like Bloxx it or Terminator. as those knots need sealing,.
And then use a flexible exterior paint like Superflex. All products by Fleetwood Paints and available nationwide.
I sprayed my two planters after priming them with Bloxx It. I am using them for interior use and wanted a matt black. I bought a cheap spray paint in Mr Price for 3euro. Looks good though doesnt it.
You can line the interior or just add a pot like I did.
Hope you could follow along and you will be inspired to give this a go yourself. It will be great practice for your DIY skills and you will learn a lot. The second planter will be better than the first! We get better as we learn.
There is a reel on instagram and details stories if you want to watch www.instagram.com/shabby.ie
LOVE AILEEN xx


