HOW TO BUILD A STACKED SUITCASE TABLE
HOW TO BUILD A STACKED SUITCASE TABLE
By Guest Blogger Tammy Schultz of Redesigned Frame of Mind

HOW TO BUILD A STACKED SUITCASE TABLE
Materials Needed:
- MATERIALS
- suitcases
- 18″ 4×4
- 3/4″ plywood
- drywall screws (2″ & 3″)
- map/atlas
- water based glue
- antiquing glaze
- drill
- lauan
Step 1: Making Legs

1. Cut 4×4 lumber into four legs. These suitcases all had a taper, so the back legs where cut at 3 1/4″ long, while the front legs where cut 4″, to compensate for the taper. If your cases sit flat, you can make all 4 legs the same length ( I decided to make a 15% angle cut 2″ down each leg piece- just so the legs look a little more “finished”, but this is up to you.)
2. Decoupage torn pieces of map on each leg, let dry overnight. Use watered down antiquing glaze to age the map legs,if desired, and let dry overnight. ( If you need to use wedge pieces in between the cases (see last step) you will want to cut & finish them in the same manner at this time
Step 2: Attaching Legs
1. Cut plywood strips 4″ wide to fit inside bottom suitcase from front to back (length will vary depending on suitcase dimensions)
2. Place leg under bottom suitcase, lining up with the middle of the plywood strip inside bottom suitcase.
3. Drill holes down threw plywood ,suitcase & leg.
4. Run 3″ screws down from inside the bottom suitcase, threw the suitcase bottom & into the top of the leg.
5. Repeat with other legs
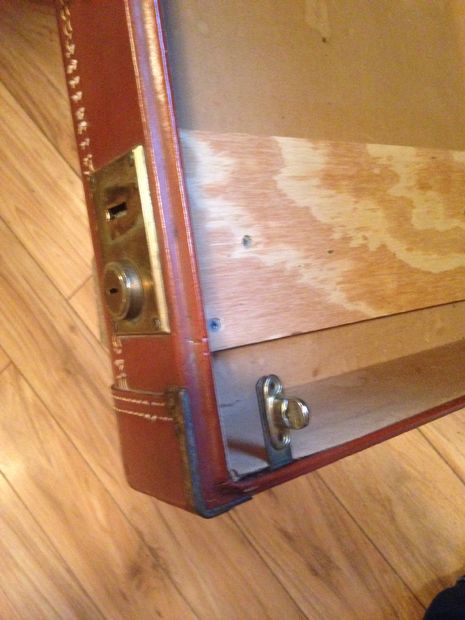
Step 3: Screwing suitcases together


1. Cut 2 1/2″ strips of plywood or scrap wood the length of each suitcase. These will be your attaching strips. You will need 2 for the top suitcase (bottom only), 4 for the middle case(top & bottom), and 2 for the bottom case(top only).
2. Working from inside the bottom case first, drill and screw (2″ screws) a suitcase sandwich- think about it like this one attaching strip is your bottom bread (it sits up inside the lid of the bottom suitcase)the lid of the bottom suitcase is the meat of the sandwich,the map covered wedge piece(if needed- see last step) is the cheese of the sandwich, the bottom of the middle suitcase is the lettuce on the sandwich, and inside the bottom of the middle suitcase is another attaching strip, which is the top bread of your sandwich!
3. Put 2 attaching strips in each case, one towards the front & one towards the back
4. Repeat the sandwich technique with the small, top suitcase.
5. Cut a piece of thin finished wood to lay inside open top case, in case it may be used with the top opened.
Step 4: If your suitcases are not flat, wedge them!
These suitcases tapered more narrow at the front, so I wasn’t going to get a flat topped table, if I couldn’t counteract the tapper. If you are smarter then me (betting you are) and choose perfectly flat cases, you can skip this step.
1. measure and cut 3/4″ plywood pieces to sit in between the cases, one under the top case, and one under the middle case. The length of each suitcase will determine the length of the wedges ,while the amount of taper will determine the % of angle these wedge pieces need to be.
2. Cover the wedge strips with the maps, when dry, finish with watered down antiquing glaze in he same manner you did the legs, as some of the strips will be seen on the finished project.

Thank you Tammy Schultz for sharing this fabulous project.
You can follow Tammys page on Facebook here